ShopDreamUp AI ArtDreamUp

Deviation Actions


Suggested Deviants


Suggested Collections


You Might Like…


Featured in Groups

Description
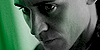
The steps of my latest work "The Trial of Loki (colour pencils)". Some intermediate steps look really weird...
I photographed the steps 1-15 with my Canon EOS 600D (EOS Rebel T3i) without flash. In some pictures a lamp outshines the drawing and it reflects the light a little bit (e.g. 14 and 15)... Step 16 is the scan.
Please don't upload my pictures somewhere else without my permission. Don't infringe copyright!
Here is the finished drawing and a tutorial for mixed media:


Update: Here is my working process for this drawing:
Sorry in advance for all the mistakes (It would have been much more easier to write this in german!).
First off here my equipment:
- Polychromos colour (/colored) pencils (Faber-Castell, see numbers below... I hope that I remember them right)
- pencil HB (Faber-Castell)
- eraser pencil (Faber-Castell Perfection 7057)
- colour pencil sharpener (if you use a normal pencil sharpener the colour pencil can break, because it's too slim)
- set square
- paper A4 (210x297mm, 190 g/m²)
- a printed reference picture (edited in photoshop, because screencaps are often too dark!)
step 1: The first step is one of the toughest parts. I start with a rough sketch to get the right proportions and then I measure the distances of important parts (like the eyes) on the reference to check if everything is alright. Then I draw them properly (don't press to hard!) and add a few shadows to test if everything looks good. (The "grid method" can be very helpful as well for a few parts!)
step 2: I erase the lines until I see them only slightly, because I don't want to see pencil under my light colour pencil layers...
step 3: Colour is next! I always start with the eyes ("black 199", "earth green 172", "phthalo blue 145", "warm grey III-VI 272-275", "white 101", "burnt karmin 195") and some borders ("light flesh 132").
step 4: Base colouring of the face ("light flesh 132")... don't press to hard at light parts! This step looks always weird, but you have to go on...
step 5: Then I add a few "medium shadows" with a darker colour ("cinnamon 189" or "venetian red 190")
step 6: Initiation of the dark shadows with a little bit of black (also start of the hairline, eyebrows and eyelashes) and mainly dark brown ("walnut brown 177").
step 7: Complete all dark shadows of the face with a thin layer of brown ("walnut brown 177") and start with the mouth (a dark red rose tone, black, brown and white)
step 8: Blend all shadows (dark parts: "medium flesh 131"; light parts: "light flesh 132", "white 101") and darken the dark parts with a little bit of black
step 9: Next layers for the face: again brown for the shadows ("nougat 178") and different dark flesh colours for the transitions and a few parts ("cinnamon 189", "venetian red 190", "indian red 192"). Colouring of the hair (many lines of "black 199" and "bistre 179" for the shiny parts) and black parts of the armour ("black 199").
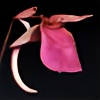
step 10: Procedure for the clothes: very dark shadows with a light layer of black or a dark colour, then a layer of the bright colour,... a few colours and layers later it's finished... sorry... I can't remember the exact process! The order and number of layers depends on the object. But I think that I always blend at the end with a bright colour and refine shadows and some parts with black.
step 11: For the collar see step 10 ("black 199", "white 101", shades of ochre 183 & 184, "green gold 268", "raw umber 180", "burnt ochre 187", "nougat 178"). This step felt like an eternity...
step 12: Base colour for the background ("nougat 178")
step 13: Dark parts of the background ("black 199")
step 14: Finalisation of the background with blending of many different colours ("warm grey I-VI 270-275", black, different shades of ochre and brown). Now the face and the hair seems to be too bright, which leads to the next step...
step 15: Darkening of the face (shadows: "bister 179"?, again dark brown, dark flesh colours and black) and the hair (eyebrows as well). Correction of details (look: see corner of the mouth, eyes, eyelashes, darken "the white of the eye")
step 16: scan (edit the picture in Photoshop CS5: cut out the border, edit brightness/contrast and colour balance if the colours are wrong)
Estimated time (with the help of these pictures): ~25h (!?)
Update2: I adjusted the colours of the photos, but the quality of 14 and 15 is still very bad, because of the reflections (and the photos were very dark too).
I photographed the steps 1-15 with my Canon EOS 600D (EOS Rebel T3i) without flash. In some pictures a lamp outshines the drawing and it reflects the light a little bit (e.g. 14 and 15)... Step 16 is the scan.
Please don't upload my pictures somewhere else without my permission. Don't infringe copyright!
Here is the finished drawing and a tutorial for mixed media:
Update: Here is my working process for this drawing:
Sorry in advance for all the mistakes (It would have been much more easier to write this in german!).
First off here my equipment:
- Polychromos colour (/colored) pencils (Faber-Castell, see numbers below... I hope that I remember them right)
- pencil HB (Faber-Castell)
- eraser pencil (Faber-Castell Perfection 7057)
- colour pencil sharpener (if you use a normal pencil sharpener the colour pencil can break, because it's too slim)
- set square
- paper A4 (210x297mm, 190 g/m²)
- a printed reference picture (edited in photoshop, because screencaps are often too dark!)
step 1: The first step is one of the toughest parts. I start with a rough sketch to get the right proportions and then I measure the distances of important parts (like the eyes) on the reference to check if everything is alright. Then I draw them properly (don't press to hard!) and add a few shadows to test if everything looks good. (The "grid method" can be very helpful as well for a few parts!)
step 2: I erase the lines until I see them only slightly, because I don't want to see pencil under my light colour pencil layers...
step 3: Colour is next! I always start with the eyes ("black 199", "earth green 172", "phthalo blue 145", "warm grey III-VI 272-275", "white 101", "burnt karmin 195") and some borders ("light flesh 132").
step 4: Base colouring of the face ("light flesh 132")... don't press to hard at light parts! This step looks always weird, but you have to go on...
step 5: Then I add a few "medium shadows" with a darker colour ("cinnamon 189" or "venetian red 190")
step 6: Initiation of the dark shadows with a little bit of black (also start of the hairline, eyebrows and eyelashes) and mainly dark brown ("walnut brown 177").
step 7: Complete all dark shadows of the face with a thin layer of brown ("walnut brown 177") and start with the mouth (a dark red rose tone, black, brown and white)
step 8: Blend all shadows (dark parts: "medium flesh 131"; light parts: "light flesh 132", "white 101") and darken the dark parts with a little bit of black
step 9: Next layers for the face: again brown for the shadows ("nougat 178") and different dark flesh colours for the transitions and a few parts ("cinnamon 189", "venetian red 190", "indian red 192"). Colouring of the hair (many lines of "black 199" and "bistre 179" for the shiny parts) and black parts of the armour ("black 199").
step 10: Procedure for the clothes: very dark shadows with a light layer of black or a dark colour, then a layer of the bright colour,... a few colours and layers later it's finished... sorry... I can't remember the exact process! The order and number of layers depends on the object. But I think that I always blend at the end with a bright colour and refine shadows and some parts with black.
step 11: For the collar see step 10 ("black 199", "white 101", shades of ochre 183 & 184, "green gold 268", "raw umber 180", "burnt ochre 187", "nougat 178"). This step felt like an eternity...
step 12: Base colour for the background ("nougat 178")
step 13: Dark parts of the background ("black 199")
step 14: Finalisation of the background with blending of many different colours ("warm grey I-VI 270-275", black, different shades of ochre and brown). Now the face and the hair seems to be too bright, which leads to the next step...
step 15: Darkening of the face (shadows: "bister 179"?, again dark brown, dark flesh colours and black) and the hair (eyebrows as well). Correction of details (look: see corner of the mouth, eyes, eyelashes, darken "the white of the eye")
step 16: scan (edit the picture in Photoshop CS5: cut out the border, edit brightness/contrast and colour balance if the colours are wrong)
Estimated time (with the help of these pictures): ~25h (!?)
Update2: I adjusted the colours of the photos, but the quality of 14 and 15 is still very bad, because of the reflections (and the photos were very dark too).
Image size
1200x1133px 491.66 KB
© 2014 - 2024 Quelchii
Comments107
Join the community to add your comment. Already a deviant? Log In
Great Work! I'm very impressed! ![]()